Friday, March 2, 2012

Decode PDF and Extract Javascript

1. Introduction
In the previous articles we looked at how to manually create a PDF and how to embed JavaScript inside the PDF document. I will now continue to look at how to extract JavaScript and decompress a PDF in order to reverse engineer the code inside. When a PDF is created or saved, the streams inside the PDF are commonly compressed and encoded with filters such as “FlateDecode”. The stream objects in a PDF are the objects which contain the JavaScript or text which we wish to read. Many times malware authors embed their malicious code inside these JavaScript streams and it is beneficial for security professionals to extract and decompress these streams. Let us revisit the PDF example presented in the previous article How to Embed JavaScript into PDF. Since the PDF was manually created, the streams are in plaintext, however, we will use Adobe Acrobat 9 to save the file again and this time the streams are encoded and not readable in a file editor.


Above is a partial view of the PDF we created in the previous article with the streams encoded. As you can see the PDF has been modified. More objects have automatically been added and the original streams with JavaScript are not readable. Also the first header line which tells me the PDF specification this document follows has been changed as well. Originally it was “%PDF-1.6”, now it is “%PDF-1.6”. This is due to the version of Acrobat I used which is Acrobat Pro 9. Other changes can also be found such as metadata that is now included in the document.


The streams may be compressed with several different filters, most commonly the FlateDecode filter is used to encode a PDF. After inspection of the document we can see that the PDF has been encoded using the filter FlateDecode. There are two tools we can use this decode the PDF. The first tool is “pdftk” available for download at http://www.pdflabs.com/tools/pdftk-the-pdf-toolkit/. This program runs on Windows, Linux, Mac OS X, FreeBSD and Solaris. It has many features which allow us to manipulate a PDF, among them is the ability to decompress streams and read the file in plain text. The second tool is “Jsunpack-n”. It is a powerful tool to decode and extract JavaScript from a PDF file.

2. PDF Toolkit
PDF toolkit is easy to install. Download the zip file from their website and place it in a convenient location. Then add the location of the bin folder to your environment variables. This can be done by accessing the properties of your computer and clicking on the advanced tab.


Click on “Environment Variables” and here we locate the "Path" variable and add the location of our bin folder for pdftk. This allows us to use pdftk from the command prompt without having to navigate to the program folder each time.


Below is the command used to decompress the PDF file. First is the call to the program pdftk. Second we list the location of the PDF we wish to decompress. Third is the parameter output. Here we list the new filename we wish to use for our decompressed file. Last we specify the parameter “uncompress” which will decode the streams in the PDF file. To view all the commands in pdftk and the accompanying examples, type the command “pdftk –help”.


The decoded file is created and below is the file opened in the file editor notepad++. Selected parts of the code are shown below with the corresponding line number to the left.


First we can see that the streams are in plain text. We can identify the object 9 which contains the JavaScript for our alert box. Something to notice is that for the xref section of the file we had previously left this part blank with only the object name. After it was encoded and decoded the offsets were automatically calculated for all the objects.

3. Jsunpack
The second tool we can utilize to decode and extract the JavaScript in a PDF file is Jsunpack. I tested it on Ubuntu 10.04 and the latest version can be obtained by running the following code in Ubuntu

               $ svn checkout http://jsunpack-n.googlecode.com/svn/trunk/ jsunpack-n

Follow the instructions in the INSTALL file to complete the installation. After installed we can use the terminal to examine a PDF file. I tested it on my previous sample PDF file and the file was decoded however no JavaScript was decoded. Therefore I tested it on a sample JavaScript clock file which served as a better example. The JavaScriptClock file is available at http://www.PDFscripting.com/public/47.cfm. Open the file in a file editor and it is visible that the streams are encoded.

Below is the command to call the PDF python script. You provide the location of the PDF file and the python script handles the rest. For more verbose information on the file attach a “-v” to the end of the command. The command below decodes the file and extracts the JavaScript embedded in the PDF to a separate file that we can examine. Jsunpack appends “.out” to the new file created.


“JavaScriptClock.PDF.out” contains the JavaScript and below is a partial output in gedit. We can see all the functions and declarations that were made using JavaScript. This provides a useful way to look at obfuscated PDF that may contain malicious code.


4. Conclusion
To conclude, there are tools that exist to make it easier to manipulate and decode PDF documents. Above I have shown two tools, pdftk and Jsunpack, that are useful to decode streams in a PDF. The streams will usually contain JavaScript and unfortunately malware authors will embed JavaScript that will perform undesired functions in another user’s computer. These tools allow us to reverse engineer the code and discover if malicious code is embedded. As shown above Jsunpack also provides the user with all the JavaScript in a separate file which is useful for analysis. In the next article I will explore buffer overflow attacks and vulnerabilities of PDFs and previous versions of adobe acrobat.

References
[1] "Document Management - Portable Document Format", Available at
       http://www.adobe.com/devnet/pdf/pdf_reference.html
[2]  Michael Leigh, "Malware Analyst's Cookbook and DVD", Available at
       http://www.amazon.com/Malware-Analysts-Cookbook-DVD-Techniques/dp/0470613033

Sunday, February 26, 2012

How to Embed JavaScript into PDF

1. Introduction
In this article I continue from my last post How to Manually Create a PDF. I explain how to embed JavaScript into a PDF document and how to extract the JavaScript from a document as well. Malicious code is often embedded as JavaScript inside a PDF document and extraction of the JavaScript is a useful method to isolate and reverse engineer the code for security professionals.

2. AlertBox Example
In the last article I explained the format for a PDF and provided a simple example that printed “Hello World!” at the top of the document. It contained only the bare essentials and we will now add on to the example and include JavaScript. Below is the code for the original example created in the last post.


In order to introduce JavaScript to the PDF we need to modify the original example and add three new objects. The first object will be an indirect object that has a reference to the JavaScript object.


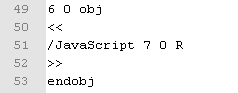
As you can see in the figure above, object 6 has the JavaScript tag and points to the object 7. That is all we need to include for the first object. The second object will be another pointer. It will include the “Name” tag and this allows us to name the JavaScript code we will introduce to the PDF document. As you can see we have a reference to the third object which is object number 8. The name I give the JavaScript code I will introduce is “My Code”.


The third object I need to introduce to embed JavaScript is an object with the actual JavaScript code. In my example this is object number 8.


Object 8 has three tags we need to include. The first is the “/JS ” tag which stands for JavaScript and holds the JavaScript code we wish to run. In this example I utilize the app object and use the method alert. This allows me to display an alert box when the PDF is opened. “cMsg” defines the message I wish to display within the textbox and “cTitle” is the title header for the textbox. The second tag is “/S” which describes the action dictionary which leads to my third tag which is “/JavaScript”. In order for my JavaScript to run we must make final adjustments to the PDF document. We must update the xref section of our document to account for the three new objects added.


The x ref tag will now include 9 objects and the size tag will change to 9 as well. The last modification to make is in our catalog object which is our root object 1.


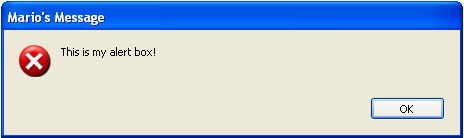
We must include a reference to our JavaScript object which is object 6. We use the “/Name” tag to set the pointer. Now we have a fully functional PDF that will run the JavaScript when the document is opened. Below is a screenshot of the alert box that is produced by the JavaScript in my example.


3. TextBox Example
Let us look at another example that uses JavaScript to introduce a text box into the PDF document. We can use the template from above and make one simple change to the JavaScript section. In order to modify our JavaScript we only need to change object 8.


Here we have the same tags and only modify what is inside the parenthesis. In order to add a text box I use the document object and gain access to it by using “this”. “this” is a pointer to the current document and I am able to create a text box by using the “addField” method. Line 64 shows how I implement this method. “addField” takes four parameters. The first is the name for my textbox and in my example it is simply “My Text Box”. The second parameter is the type of field we wish to add. Since we require a textbox I use “text”, however others such as button are also available. The third parameter is the page of the document. It is an index that begins at zero and since I want the textbox on the first page, the value of the parameter is 0. The last parameter is the position of the text box. Previously on line 63 I initialize the coordinates of the textbox. Position takes a list of four numbers, measuring the box from left-top corner, right-top corner, bottom-left corner, and bottom-right corner. After this change we have a document that produces a textbox from the JavaScript we just created. Below you can see a screenshot of the PDF example. In the upper-left corner is the text box that is displayed in gray.


4. Conclusion
To sum up, we have two examples of how to incorporate JavaScript into a PDF document. I utilized JavaScript to display an alertbox and a textbox. Many more objects and methods can be controlled using JavaScript and the full reference can be found in Acrobat JavaScript Scripting Reference [1]. In the next article I will continue to show how to extract JavaScript from a PDF and how to decode a PDF which is normally encoded with filters such as "flatDecode".

References
[1] "Document Management - Portable Document Format", Available at
[2] "Acrobat JavaScript Scripting", Available at 
       http://partners.adobe.com/public/developer/en/acrobat/sdk/AcroJSGuide.pdf

Monday, February 20, 2012

ZeroAccess Rootkit - Part 1

Abstract:
This series of articles will present an analysis of a rootkit named ZeroAccess. This malware, also known as Max++, is a devious piece of code that works on a kernel level to bypasses virus scanners and continues to evolve in each new release discovered in the wild. Throughout this series I will explore the INT 2D instruction, an anti-debugging technique that is employed by this malware. The INT 2D instruction causes a byte scission and is utilized by ZeroAccess to prevent accurate analysis of the malware and ultimately used to increase the lifespan of the program. Furthermore I will present experiments and results that show the dynamic behavior of the INT 2D instruction and what factors, including the debugging environment, will change execution. In the following articles I will also continue to reverse engineer the ZeroAccess malware and analyze how it manages to infect a computer driver, modify the export table, encode its own export table, create a hidden partition, and ultimately remain hidden while it takes control of a computer belonging to an unaware individual.

1. Background Information
Malware stands for the term malicious software. Viruses, trojans, spyware and rootkits are all examples of malware. They are undesired and deceptive programs that are installed onto a victim’s computer without their consent. The goal of these programs is to exploit a computer for various reasons. One reason that hackers write and release malware is for reputation or personal curiosity.  Currently, a more common motive is that malware is written by hackers for profit and financial gain. One example of this type of malware is the root kit named ZeroAccess. 

ZeroAccess was first seen by VirusTotal on January 24, 2010. It is a very advanced rootkit that uses kernel calls and targets windows based machines. ZeroAccess utilizes undocumented system features and employs sophisticated anti-forensic techniques to avoid analysis and increase its lifespan.  When a system is infected with ZeroAccess, the windows system files are modified and kernel hooks are created. After the hooks are in place, the program is now able to hide its processes and network connections. It also has the ability to avoid detection and removal by antivirus scanners. If a virus software attempts to access its files or processes, ZeroAccess immediately kills that service and disables the virus software.


2. Network Behavior
Let us first analyze a system that is infected with the Max++ rootkit and check the network traffic of the compromised system. In order to safely run an instance of the malware, I set up a virtual environment with virtual box. I used two virtual systems, first a machine with the Windows XP Service Pack 2 operating system, and second a system running Ubuntu. I expected the Max++ malware to hide its communications in the Windows XP system so I routed all the network traffic from the Windows system to run through the Ubuntu system. In the Ubuntu system I utilized a packet sniffer called Wireshark to inspect all incoming and outgoing packets. My goal was to find any request that Max++ makes to contact a remote server. For the Windows machine I configured the system to use an internal network card in virtual box. Figure 1.1 displays my configuration for the windows guest machine.


Figure 1.1 - Network configuration for the Windows XP virtual system

Also I enabled hardware virtualization because Max++ makes use of hardware breakpoints. Figure 1.2 is the system configuration for my system.

Figure 1.2 - System configuration for the Windows XP virtual system

Second I configured the Ubuntu machine to use the internal network card and accept connections from the windows guest machine. Below are my settings for the Ubuntu machine.

Figure 1.3 - Network configuration for adapter #1 in the Ubuntu virtual system

I also enabled the second network adapter in the Ubuntu system. This allows me access to the host internet connection. Below in Figure 1.3 is my network setting for my Ubuntu machine.

Figure 1.4 - Network configuration for adapter #2 in the Ubuntu virtual system

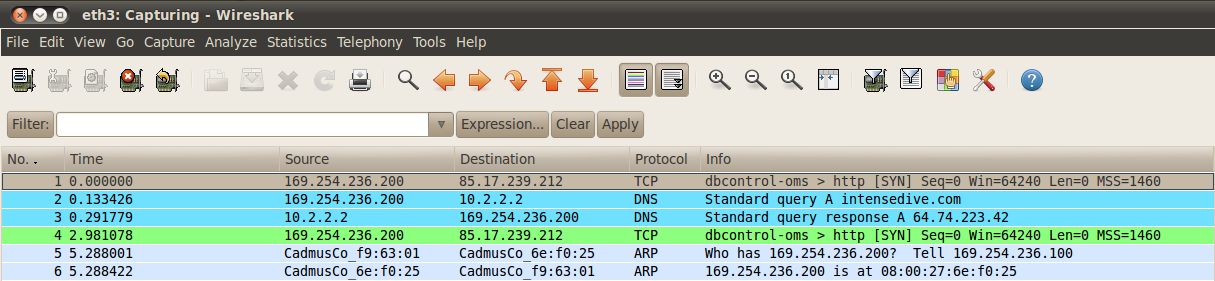
In order to complete the setup of the two virtual systems I also had to set up the IP forwarding and find out the DNS server to gain internet connectivity. After I had the systems set up I was able to use Wireshark in the Ubuntu machine and monitor all network traffic from the windows system. An important note to make here is to always make a snapshot of the virtual system before the malware is run in order to restore the machine to an uninfected state. When the executable of the malware was run on the windows host, the executable disappeared and the malware deletes itself from the folder. At this point the system was infected and Wireshark allows us to observe any suspicious activity. In Figure 1.3 is the output of Wireshark after the Max++ is executed. There is a query for “intensedive.com”. Also a standard query response from the ip address 64.74.223.42.

Figure 1.5 - Wireshark captures packets from the Windows XP system infected with Max++

We can get more information on the IP address and domain name by using the “whois” or “tracert” command on a Linux terminal. Also this can also be done on many hosting sites that provide a DNS lookup. Giuseppe Bonfa [2] in his article provides a trace on the crime ware origins of the Max++ malware and links it to the Russian Syndicate Network, which is a known friendly environment for malware.

3. File System and Registry Behavior
In the previous section we saw how Max++ has the ability to silently transmit data. Let us now analyze what files and registry items are modified by the malware. A simple way to get an initial report on a malware is to use free web services like Annubis, GFISandbox, and VirusTotal. These three services allow for web submission of the sample file. Both Annubis and GFISandbox actually run the malware in an isolated environment. They provide you with a quick analysis of the malware. Below I provide results for the Max++ malware from VirusTotal, GFI Sandbox, and Annubis.

3.1 VirusTotal Results for Max++
I submitted the Max++ executable to VirusTotal and in Figure 1.6 is the analysis summary. At the time of my submission 43 virus scanners were used by VirusTotal and 39 detected the file as malware. Also included in the summary is the SHA256 hash for the file as well. Figure 1.7 we have a list of all the virus scanners used and which scanners detected the virus. Each scanner has its own signatures and this table shows the benefit of utilizing many virus scanners. Not all virus scanners may detect the file as a malware.

Figure 1.6 - VirusTotal analysis summary for Max++

Figure 1.7 - List of antivirus scanners used by VirusTotal and the detection count

Also provided by VirusTotal is a list of all the different filenames the malware has been submitted under.

Figure 1.8 - Other names that have been associated with the same malware by VirusTotal

3.2 GWISandbox Results for Max++
I submitted the Max++ executable to GWISandbox and below are the results for my submission. GWISandbox actually runs the file in a remote isolated environment and is able to give you a quick analysis of the infected system.

Figure 1.9 shows the analysis summary returned by GWISandbox. The MD5 hash is provided for the file as well as the size and number of processes it starts on the system. The type of sandbox system is returned and in this analysis the malware was executed on a system with the Windows XP Service Pack 3. The number of processes that are run by Max++ is 3. Later in the detailed report of Annubis we are also given the name of the specific processes and the files they create, delete and modify. On the second table in Figure 1.9, the digital behavior traits section gives us an overview of the actions taken by the malware. The Max++ malware spawns new services, deletes the original executable, injects code, and modifies files and registries on the infected system.

Figure 1.9 - Analysis summary provided by GWISandbox

Included in the report we have the files that are deleted by the malware. Figure 1.10 shows us that the original executable file is deleted by the same process.

Figure 1.10 - GWISandbox report of files deleted by the Max++ executable
Figure 1.11 - GWISandbox report of files created and modified by Max++ executable

Not only does the Max++ remove the original file that infects the system, it also creates and modifies files in the windows system folders. Specifically we can see in Figure 1.11 that three files are created in the Windows system32 folder. “afd.sys” and “afd.sys.new” is added to the drivers folder. “afd.sys.new” is also added to the “dllcache” folder in windows as well.

GWISandbox also presents us with the registry values that are set by the malware. Below in Figure 1.12 four modifications are performed. The first three modify a registry in the “ControlSet001” folder. It appears to add its own service “afd”, which we saw previously that Max++ created this file, to start on system boot. The fourth modification is to a registry for the Internet Explorer browser. This will most likely make browsing in Internet Explorer insecure.  Also in Figure 1.12, under the network traffic table, we can see a connection is made by the malware to a remote IP “10.20.25.255”.

Figure 1.12 - GWISandbox report of registry files modified and network conections made by Max++

3.3 Annubis Results for Max++
Among the three online services to submit a malware sample and receive an analysis, I found Annubis to be the most complete and detailed report. The full report is extensive and I will only discuss a portion of the results in this section.

Figure 1.13 - Annubis analysis summary for Max++ executable

The analysis summary of the report from Annubis can be seen in Figure 1.13. We are given a description of the actions Max++ performs as well as the risk, which is color coded and ranges from low to high risk. The first behavior observed by Annubis is that Max++ changes the security settings of Internet Explorer. This is supported by the GWISandbox analysis which reported a registry in the Internet Explorer folder had been modified. In Annubis this change is identified as a medium risk to the system. Annubis also reports that Max++ creates, modifies, and deletes files from the computer. It is classified as a high risk to the system. As seen by the GWISandbox report we know the original malware file is deleted and other files are added to the system folder. Also we know three processes are run by the Max++ executable and Annubis reports the same here. The last behavior observed is related to the registers that are read, created, modified and monitored by the malware. Annubis reports this behavior as a low risk to the system.

Figure 1.14 - Annubis analysis of modules loaded at execution of Max++

From Annubis we can also tell which modules are loaded at runtime of the Max++ malware. In Figure 1.14 we have a list of the loaded dll’s. Among them is “ntdll.dll” and we will later see, using a debugger, how the malware searches for this driver and creates its own functions to perform.

Figure 1.15 - Annubis analysis of the file activity for the Max++ primary process

As we have seen from the initial summary by Annubis, three processes are executed by the malware. In Figure 1.15 we see file activity from the main process of Max++. The file “appcompat.txt” is created in a temporary folder. Also the main process reads data from the driver “winsock.dll”.

Figure 1.16 - Anubis analysis of processes started by the Max++ malware

In Figure 1.16 we have a list of the new processes that are started besides the main process of Max++. Specifically, “dwwin.exe” and “drwtsn32” are two processes that are started by the malware. In comparison to GWISandbox, Annubis allows us to see not only the changes that are made by the main process of Max++, but the changes that are made by the child processes as well.

Figure 1.17 - Annubis Max++ analysis of registry modifications due to the dwwin process

The process dwwin.exe is started by Max++ and Figure 1.17 displays all the registry modifications that are made by this child process. We are able to see the registry keys and new values that are created for each element. All the registries that are modified by this process have to deal with Internet Explorer and are likely crippling the security features of the browser.

Figure 1.18 - Annubis Max++ analysis of file activity by dwwin process

In Figure 1.18 Annubis gives us the files modified by the “drwtsn” process. We have one dump file “7B563.dmp” that is created and later deleted from the temporary folder of the system. Also another file is deleted, “9ad1_appcompat.txt”. This information that was not presented by GWISandbox in the report it generated.

Figure 1.19 - Annubis Max++ analysis of registry values modified by drwtsn process

A second process, “drwtsn”, is started by the Max++ executable. Figure 1.19 displays the registry changes that are made by this child process. “drwtsn” is a system file that is part of the windows operating system. The file is normally located in “C:\windows” or “C:\windows\system32”, however, malware is known to disguise as this system file [2]. Also in Figure 1.20 we have all the file changes performed by the “drwtsn” process. A new folder is created labeled “Dr Watson” and this folder is installed under the Microsoft directory. Here the executable, log, and dump file are created. The process also accesses information stored on the original Max++ executable file. Annubis also provides us with the file system control communication and the device control communication. The file “isarpc” is accessed three times, and the file “ksecDD” is accessed eight times in the Annubis analysis.

Figure 1.20 - Annubis Max++ analysis of file activity by drwtsn process
4. Conclusion
To briefly summarize this section, Max++ is an advanced rootkit that creates, modifies, and deletes files/registries on a computer without the users consent. It opens network connections and the penetration of Max++ is extensive. I have presented several malware analyses from web services online and have presented the changes they report on an infected system. I will continue to delve into the code of the Max++ rootkit and analyze an anti-debugging technique frequently used by this malware.

5. References
[1] Dr. Xiang Fu, Malware Analysis Tutorial 1: VM Based Analysis Platform, Available at
[2] Guiseppe Bonfa, "Step-by-Step Reverse Engineering Malware: ZeroAccess / Max ++ / Smiscer 
       Crimeware Rootkit", Available at http://resources.infosecinstitute.com/step-by-step-tutorial-on-

Sunday, February 19, 2012

How to Manually Create a PDF

The Portable Document Format (PDF) was a proprietary format controlled by Adobe until July 1, 2008 when the open standard was released to the public. It is independent of software, hardware, and operating system and this format is commonly used for document exchange. One topic for a later discussion is the utilization of PDF’s to embed malicious code and run on an unsuspecting computer. First let us concentrate on the different sections of a PDF and how to create a document manually.


A PDF is a file that consists of several objects. In general you have four parts to a PDF file structure.
  1. The header states the PDF specification that this file follows
  2. The body contains all the objects that make up the document
  3. The cross-reference table list the locations of the indirect objects in the file
  4. The trailer specifies the location of the cross reference table and other special objects


Below is a simple example PDF I created with notepad. It prints out a “Hello World!” message centered at the top of the document. I will show the code and explain each section one by one.


The header section contains the version of the PDF specification that my file conforms to. In my example I use the version 1.0. Next is the first object which is a catalog object. If you think of a tree data structure the catalog object would be the root and all other elements grow or build onto this node.


Line 3 of the code specifies the object number is 1 and the generation is 0. Similar to the html language, the object must be enclosed with starting and closing tags. Line 3 you have an “obj” tag which specifies this is an object. On line 9 you have an “endobj” closing tag which identifies the end of the object. The double angle brackets on line 4 and 8 are necessary to enclose a dictionary object which is simply a pair of objects where the first element is a key and the second element is a value. Line 5 specifies the type of the object which is a “Catalog” object. Let us disregard line 6 for now and discuss it later when we attempt to describe actions to perform when opening a document or when we later explore inserting JavaScript into our PDF. Line 7 is a reference to a “Pages” object which will contain more references to individual “Page” objects. Here we list the object number of the “Pages” object which is 2 and generation which is 0. The “R” in the statement is a keyword that stands for reference.


Our second object is the “Pages” object which will contain references to individual pages. Be careful not to confuse the “Pages” object with the “Page” object. As you can see above, the type of this object is pages and we introduce a new entry called “Count”. Count refers to the number of pages that this current object points to. In this simple example we only have one page. Line 15 we specify a required keyword “Kids” which points to the object with the individual page object. The next object is our “Page” object and it is object number 3.


Similar to the “Pages” object, the “Page” object also has to declare its type in line 21. In line 22 instead of kids you must list the parent of the object which in this case is object 2 (Pages). In Line 23 I list the resource I use for this object which the object font is necessary. Here I only declare a name for the font I will use and give a reference to a font object that fully declares the font type and size. In my example, my “Font” object is number 5. Line 25 I use the entry “MediaBox” and it is a required entry for a page object. It defines the boundaries of the page. The last entry I use for the Page object is “Contents” and this specifies a reference to an object that will contain our text we wish to display. In my example this is object 4 which is a stream object.


First in line 31 we must include the length and this is the byte size starting after stream to right before endstream. If we calculate the bytes we get the size to be 45. Next are the tags for the stream object. Line 32 is the start tag for stream and line 37 is the end tag for stream. Line 33 and 36 are opening and closing tags for text as well. “BT” stands for begin text, and “ET” stands for end text. Line 34 calls on our font which we declared as “F1” and the font size is set to 24. Something to note is how functions and parameters are called. The parameters of a function are pushed on the stack first, after the function is called and pops the parameters off. This is what is happening in line 34. The font “F1” and the size 24 are pushed on the stack. After the function “Tf” is pushed on the stack and pops the two parameters off the stack. On line 35, 250 and 700 is distance beginning from the bottom right side of the document. At this coordinate is where the text “Hello, World!” will be displayed. Additional if we desired we could add an optional filter to decode parameters if not in plain text.


Object number 5 is the font object that has been referenced beforehand. Here we fully declare the font object. We must first declare the type similar to the catalog and page objects. The type for this object is “Font”.  Line 43 is a required entry in the font dictionary. There are seven subtypes that can be chosen and the different values can be found in the Portable Document Format Specification [1]. For our example I use “Type1”. The entry “BaseFont” on line 44 simply describes the font name we use which is Helvetica.


The last section that must be included to close a PDF document is the xref and trailer section.
Line 49 specifies the number of object entries in the document including the xref object. The number of objects is 6 and it is again referenced inside the trailer section to indicate the size. Also in line 54 we have a reference to the catalog object (Object 1) which is the root node. We end with a closing startxref tag and an end of file tag on line 58. This completes the creation of a PDF and will be read by a PDF reader. Only the bare essentials are included in my example and normally in the cross reference table one would include the offsets for each object in the document.

In the next article I will explore actions that are available in the PDF format as well as embedding JavaScript in a document.


References
[1] “PDF Reference and Adobe Extensions to the PDF Specifications”, Available at http://www.adobe.com/devnet/pdf_reference.html